Navigating the Supplier Journey: Assigned Assignments & Actions
1. Dashboard Creation: A dashboard will be automatically generated after submitting the company profile.
2. Accessing Assessments: Click on Assessments to view the list of assigned assessments. Each assessment will display the following details:
- Assessment Name: The title of the
assessment.
- Progress Bar: Shows the current completion
status.
- Assigned On: The date the assessment was
assigned.
- Assigned By: The individual who assigned
the assessment.
- Due Date: The deadline for the assessment's
completion.
- Action: To Accept or Decline the assigned assessment.
1. Clicking the Eye Button: When the supplier clicks on the eye button for an assessment, one of two screens will appear.
2. If Assessment is Completed: The supplier will be shown the assessment report.
3. If Assessment is Incomplete: The supplier will be taken directly to the last section of the assessment they were working on.
2. If Assessment is Completed: The supplier will be shown the assessment report.
3. If Assessment is Incomplete: The supplier will be taken directly to the last section of the assessment they were working on.
1. Task Panel Overview: Suppliers will see a list of tasks assigned to them, each requiring their input.
2. Approve or Reject Assessment: Suppliers can choose to either Approve or Reject the assessment assigned to them for each task.
3. Search Bar: Use the Search Bar to quickly find specific tasks by keyword or assessment title.
2. Approve or Reject Assessment: Suppliers can choose to either Approve or Reject the assessment assigned to them for each task.
3. Search Bar: Use the Search Bar to quickly find specific tasks by keyword or assessment title.
Once a task is Accepted or Declined, it will be sorted into the following categories:
1. All Tasks: This list displays every task assigned to the supplier, regardless of whether they have been approved, declined, or are pending action.
2. Accepted Tasks: This list contains tasks that the supplier has approved.
3. Declined Tasks: This list shows tasks that the supplier has declined, keeping track of tasks they have chosen not to engage with.
4. Start Assessment: Suppliers can begin working on these tasks by clicking the Start Assessment button.
5. Search Bar: Use the Search Bar to quickly find specific tasks in the accepted or declined lists.
After clicking on Start Assessment, the Questionnaire page will open.
1. Topics List: On the left-hand side, a list of topics will appear. The supplier must answer all questions under each topic.
2. Mandatory Questions: Some questions are mandatory. If left unanswered, the supplier will not be able to proceed to the next section.
3. Add Action: If any action is required related to a specific question, suppliers can use the Add Action option to mention their next steps.
4. Add Notes: The Add Notes button allows the supplier to add remarks or comments for any particular question.
5. Add Media: Suppliers must upload supporting documents as evidence for their answers.
6. Download Questionnaire: The supplier can download the entire questionnaire using the Download Questionnaire button.
7. Navigate Between Questions: The supplier can download the entire questionnaire using the Download Questionnaire button.
8. Save Progress: Click on the Save button to save the answers and continue later if needed.
1. Check & Submit: Once the assessment is completed, the supplier can click on Check & Submit to finalize their submission.
2. Error Notification: If any questions were missed or errors are found, a notification will pop up, highlighting the sections or questions that need input.
3. Resolve Issues: The supplier must complete the skipped questions or documents before they can proceed with the submission.
4. Final Submission: After resolving the issues, they can successfully submit the assessment.
1. The supplier can view the tasks assigned to them by clicking on the Actions button on the dashboard.
2. A list of assigned actions will be displayed, showing:
- Action Name: The name or title of the action.
- Description: A brief overview of what the action entails.
- Created On: The date when the action was assigned.
- Type: The category of the action (e.g., reporting, compliance).
- Created By: The individual who assigned or created the action.
- Responsibilities: The person(s) responsible for completing the action.
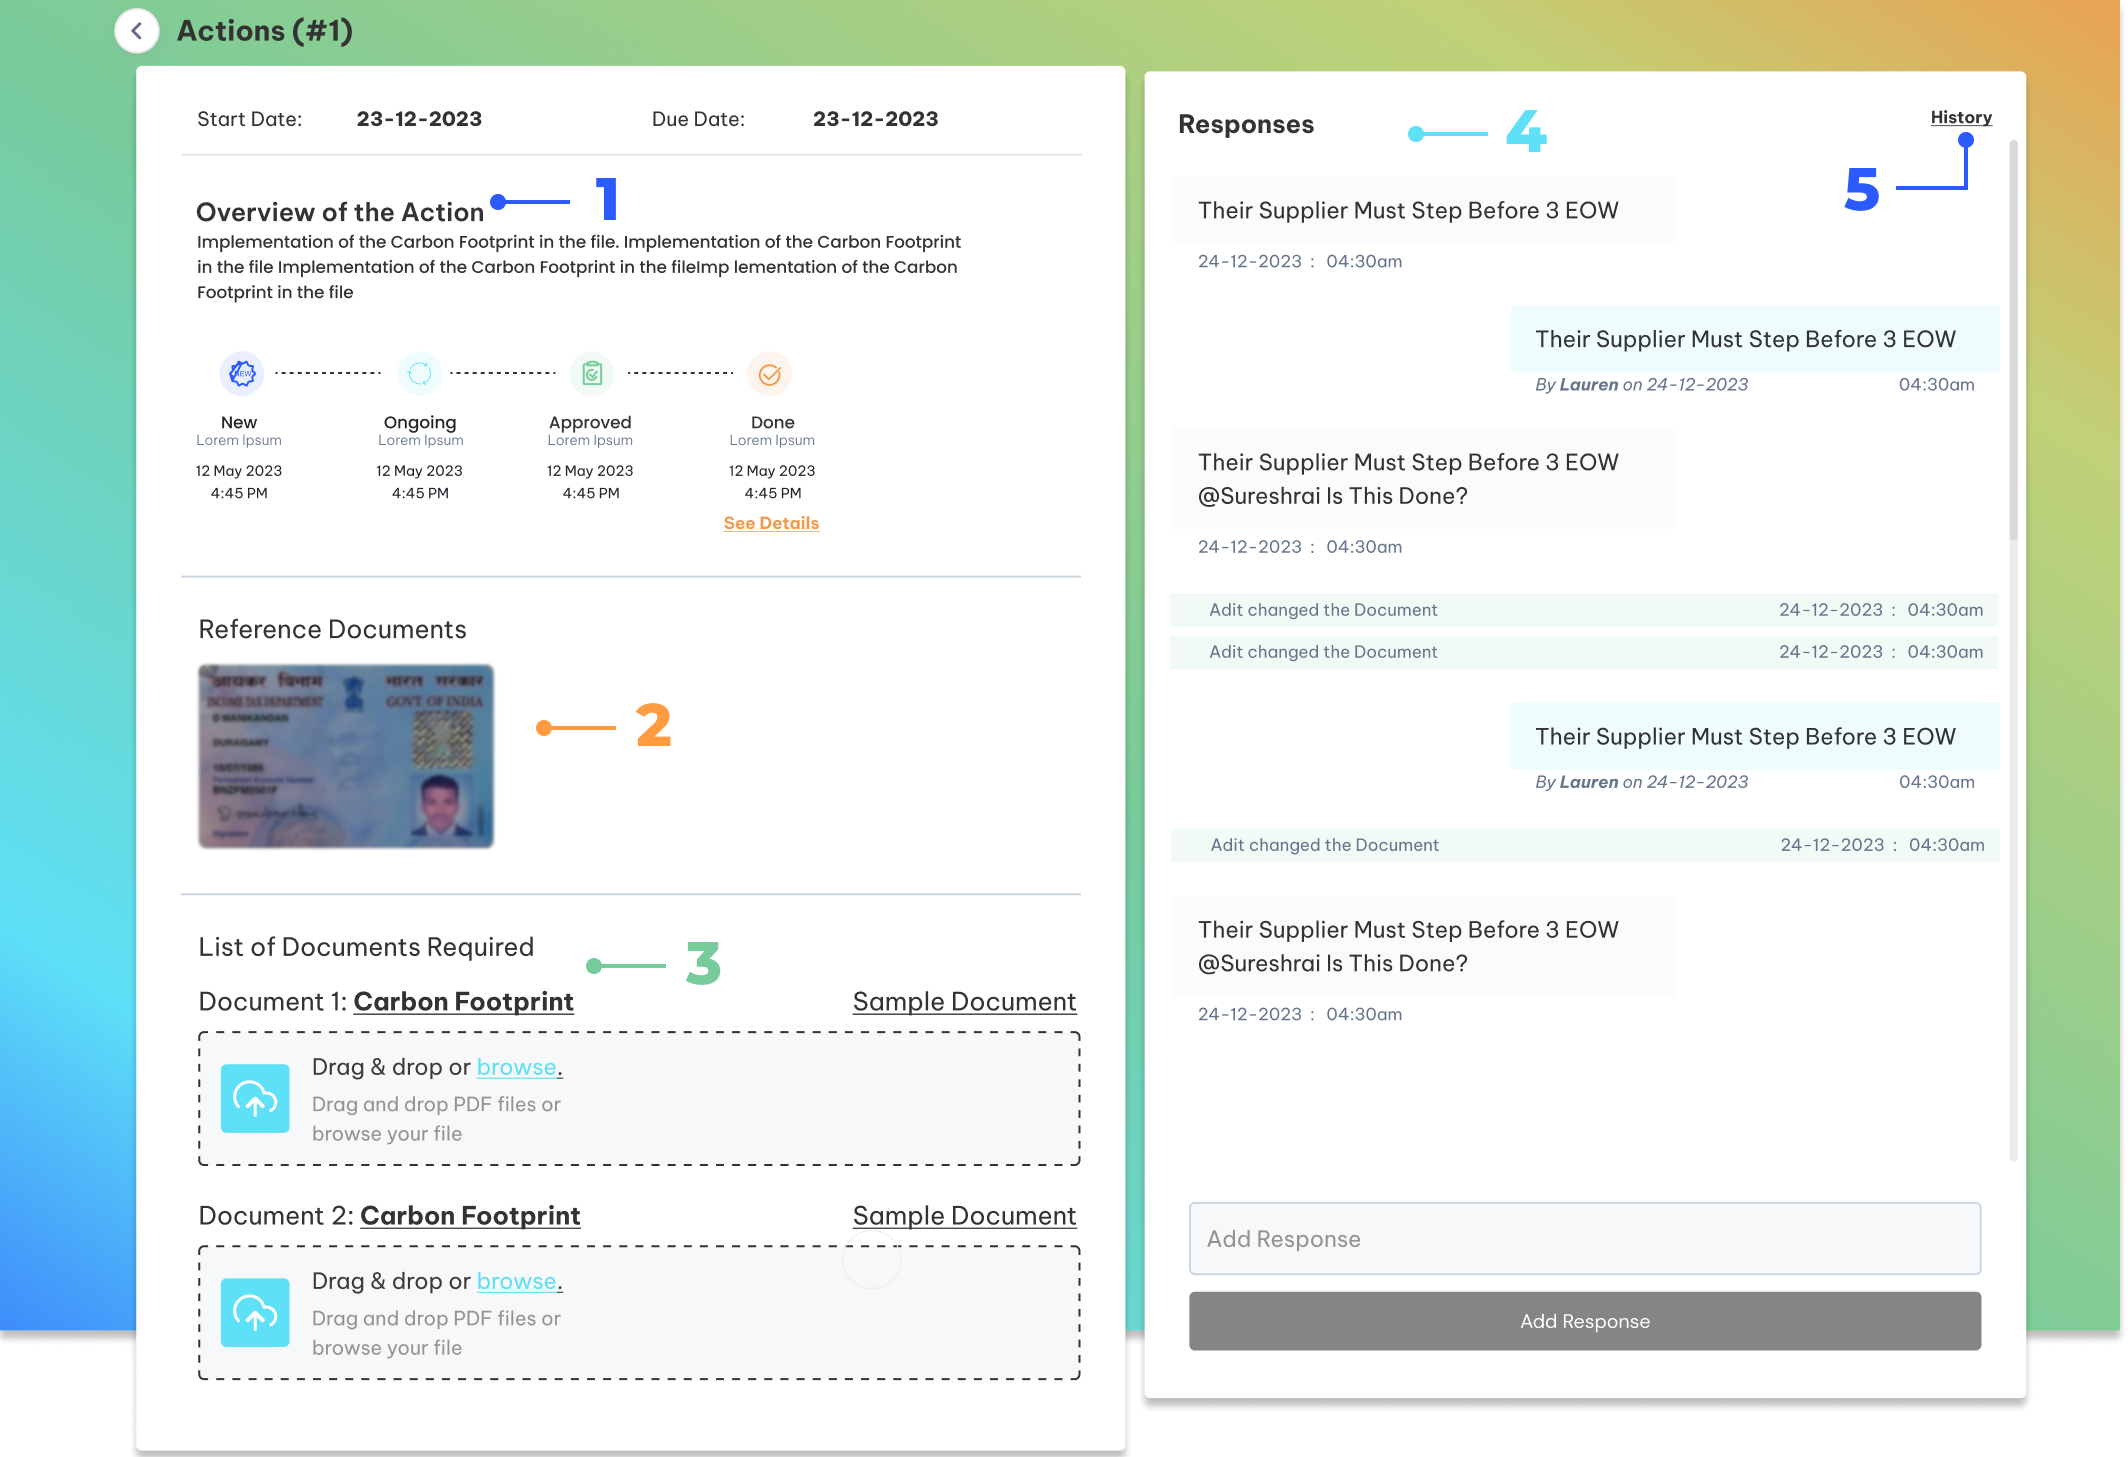
3. By clicking the eye button, the supplier can view detailed information about each action.
1. Overview of the Action: When clicking the eye button, suppliers will see the action's current status: New, Ongoing, Approved, or Done.
2. Reference Document: View the Reference Document uploaded by the admin to guide the action.
3. Required Documents: Suppliers can see the list of documents they need to upload to complete the action.
4. Chat Option: A Chat feature is available to communicate with the admin for any clarifications.
5. History: The History section shows a timeline of actions, including who worked on it and what actions were last taken.
Related Articles
Where can I view my assigned actions?
Step 1. Login to POSITIIVPLUS 1.1 Use your registered credentials to log into the portal. 1.2 After logging in, the system will direct you to the Homepage. Step 2. Go to the "Actions" Section 2.1 On the top navigation bar, click on the “Actions” tab ...Supplier Interface Overview
The Supplier Interface is your central hub to manage all supplier-related tasks. Whether you're adding, searching, or exporting supplier data, this section simplifies supplier management on the POSITIIVPLUS platform. Step 1: View All Suppliers 1.1 ...Joining the Supplier Assessment Program
1. Invitation Email: The supplier receives an invitation to join the Supplier Assessment Program via POSITIIVPLUS. 2. Accept Invitation: Click on the "Accept Invitation" button in the email. 3. Redirect to POSITIIVPLUS Signup: The supplier will be ...How Do I Manually Add a New Supplier on the Platform?
Step 1: Navigate to the “Suppliers” Section 1.1 From your dashboard, go to the “Suppliers” tab in the main navigation menu. Step 2: Click on “Add Supplier” 2.1 Once you're in the Suppliers section, click the “Add Supplier” button to begin the ...Supplier Base Overview
The Supplier Base in POSITIIVPLUS allows you to manage all suppliers effectively through easy-to-use tools for viewing, editing, rating, and maintaining accurate records. Step 1: Upload Preview 1.1 Once suppliers are added (via manual entry or bulk ...